All you need to understand to add your first Shopify product easily!
This post may contain affiliate links and we may earn a small commission when you click on the links at no additional cost to you.
If you are new to your Shopify online store, you probably find it a bit daunting to start. But one of the most basic things that you want to master to have a successful store, is adding all your product’s information correctly. In this post, we’ll teach you how to add a product, and what information you need to include to help you make sales.
On your Shopify admin, click on Products > Add product. Remember that you don’t need to add every detail listed here, but you’ll want to add all the information your product really needs in order for your business to be successful.
Name and description

First things first. You’ll have to give your product a name and write a detailed description.
Descriptions inform and persuade customers to make a purchase. If you use a dropshipping service like Oberlo, it’s best to rewrite the provided description to fit your brand. Descriptions also help with search engine optimization (SEO). By adding a description and details, you’re helping your customers find your products easier.
Adding media

Next, you can add media files to the product. You can do this by dragging and dropping files, selecting them from your computer, or by adding a URL. Visuals help your customers decide if they want to make a purchase, so it’s best to have a visual for all of your products.
Pricing your products

Now you need to add a price, which is what customers pay at checkout. The compare at price, on the other hand, is the original price for a product that’s on sale and will be shown as strikethrough text. Giving a “compare at price” encourages customers to purchase your product while it’s at a lower price. However, this will only be applied whenever you’re having a sale. If the product is not on sale, you can leave this field blank.
The “cost per item” is how much the product cost you. If you resell a product, then enter the price you paid the manufacturer, excluding taxes, shipping, or other costs. If you create the product yourself, then enter a value that is based on your labor and material costs. This helps you calculate sales profits, generate reports, and see statistics about your products.
Click “charge tax on this product” if the product is taxable.
Inventory
Under the inventory column, you see “inventory managed by”. Select “Shopify” if you manage the inventory. If you use a third-party app to manage the inventory, then you can select that option here.
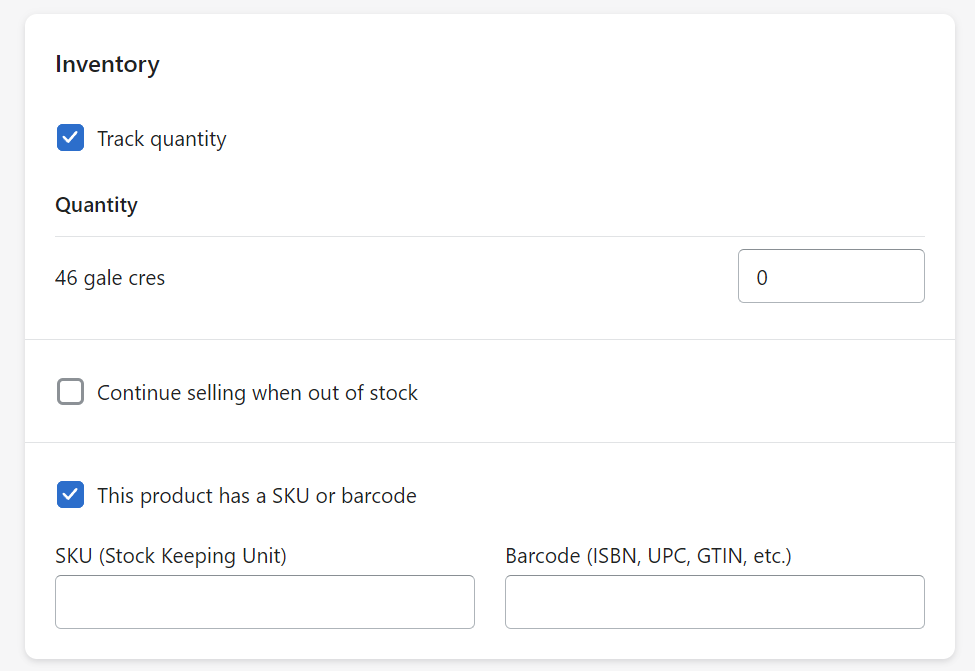
The “stock keeping unit” (SKU) is a unique value for the product. SKUs help you organize your inventory and fulfill orders.
You also see an option here to enter a barcode. Some sales channels, like Google or Amazon, require a barcode before your product can be published.
When “track quantity” is checked, the Shopify admin tracks inventory for this product. If you don’t check this box, then the quantity option is not available. If you only have a specific amount of stock, then it’s important to track inventory so you don’t sell out of an item.
You can also choose to select “Continue selling when out of stock”. Only select this if you can keep up with demand and will have inventory shortly.
Shipping

Under shipping, select “This is a physical product” if this is an item that needs to be shipped. Uncheck it for digital products or services, or for products that you never ship.
Now, enter the product’s weight. This field only appears when “This is a physical product” is checked. Product weight needs to be accurate because it’s used to calculate shipping rates. You can select between different measurements such as pounds, ounces, kilograms, and grams.
If you want to ship the product internationally with Shopify Shipping, also known as selling cross-border, then you need to enter the Customs Information for Country or Region of origin.
Next, enter the harmonized system code (HS). If you’re not sure what that is, then you can start typing in your product in the search field to look for an HS code.
Having a shipping strategy is very important for your business, take your time to make this right.
Variants

Select “This product has multiple options, like different sizes or colors” if this applies. Each product option is known as a “variant”.

Under “Options”, enter a title for the option name. Then, enter the different variants available by separating each one with a coma. Continue to add options for other variants by clicking the “Add another option” button until finished.
Search engine listing

The “search engine listing” is a preview of how your product appears in search engine results like Google. Click “Edit” to make changes to the preview.
Sales channels and apps

Sales channels are the different platforms where you sell your products. Select the checkbox for the channels where you want this product to be available.
Organization

Under “Organization” you see “Product type”. This is the category for the product. You can use the product type as a condition for an automated collection, or to filter products in the Shopify admin. A product can only have one product type. You can use a product type already made or create a new one. To create a new product type, just enter it into the “Product type” field.
The “Vendor” is the manufacturer, wholesaler, or seller of the product. If you created this product yourself, you can enter your business name or leave it blank. If you work with a lot of different manufacturers, this can be useful to organize your products.
You can also add the product directly to a collection. Collections group your products and make it easier for customers to find them on your online store. Use the “Collections” field to add the product directly to a manual collection.
Finally, “Tags” are searchable keywords associated with your product. Tags help customers find your product through your online store search, and you can also use them to create automated collections.
Product status
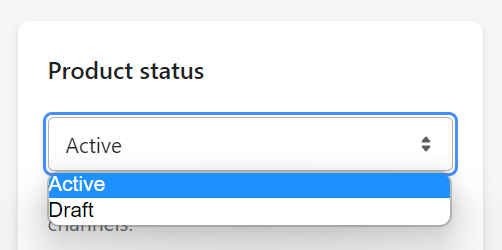
Review the details you entered and when you’re ready for this product to appear on your store, select “active” under “Product status” at the top of the page. If your store is live, then active products will be on your store for customers to buy. If you’re not ready for this item to appear on your online store, then select “draft”.
Products are saved automatically in “draft” mode until you make them active. Lastly, click “save” and your product will be added to your Shopify admin.
If you find that there’s some extra information that you need to configure but you can’t find how to add it, or if you’re having trouble understanding exactly how to add your information…
We’ll be happy to help you
Hiring a Shopify Expert can help you streamline your store's development. Having the experience of working with hundreds of stores online, we have developed a systemized process to set up any new Shopify store by following e-commerce best practices that will work for your business and actually give you a competitive advantage.
Here are a few things we can do for you:
- Want to check out if Shopify is for you? Get a 14 days trial!
- New at Shopify and not sure where to start? We can configure a solid, beautifully designed store for you and you won’t pay the monthly plan during the whole development even if it takes longer than the 14-day trial available directly through Shopify. Learn more about our Full store setup service.
- Ready to beautify your store and attract your customer's attention? Learn more about our Expert Theme Makeover service.
- Looking to migrate your online business to Shopify? Learn more about our Migration service.
- Need some coding, custom development, or bug fixes? Our dev team is ready to help you! Just contact us and let us know your current issues.
Ready to work with us? Contact us today by clicking here and tell us more about your business!

Leave a comment
All comments are moderated before being published.
This site is protected by hCaptcha and the hCaptcha Privacy Policy and Terms of Service apply.